안드로이드 sns앱 만들다가 알아낸 방법을 까먹었어도 다시 볼 수 있게 이 포스팅을 쓴다.
오늘은 firebase fireStore, storage를 이용해 recyclerView로 사진 출력하는 것을 해 보겠다.
먼저 storage에 사진을 추가해보았다.

일단 나는 게시글 만들기 기능을 만들면서 게시글에 올린 이미지들을 모두 images 폴더에 넣었고,
그리고 그 폴더 안에 사용자의 uid를 담은 폴더를 만들어서 그 안에 이미지들을 저장했다.
그 다음, firestore에 데이터들을 집어넣을 때, 사용자의 uid와 이미지 주소를 같이 집어넣었다. 왜냐하면
사용자 uid가 같으면 이미지주소를 받아와 recyclerView에 보여주게 할 것이기 떄문이다.
firestore와 storage에 데이터를 넣는 방법은 아래의 주소를 참고해 더 공부해 보자.
https://nerdymint.tistory.com/10
Firestore에 데이터 추가하기 (안드로이드)
(안드로이드 스튜디오 & 코틀린 기준 설명) (이번 편에서는 CRUD 중 Create 기능에만 집중하여 설명합니다.) 일단 firebase 프로젝트를 만들고, 앱등록을 하고, 안드로이드 스튜디오와 구글계정 연동
nerdymint.tistory.com
https://riapapa-collection.tistory.com/42
안드로이드 코틀린 : Firebase Storage 이미지 저장
안녕하세요, 랴파파입니다. 오늘은 파이어베이스 스토리지 ( Firebase Storage ) 기능을 사용해서 아래와 같이 앨범에서 선택한 사진을 Firebase Storage 공간에 사진을 업로드하는 예제 프로그램을 만들
riapapa-collection.tistory.com
데이터를 데이터베이스에 저장했으면, 이제 출력을 해볼 차례이다.
먼저 recyclerview를 쓸 것이기 때문에 recyclerview item 파일을 만들어준다
profile_fragment_recycler_item.xml
<?xml version="1.0" encoding="utf-8"?>
<LinearLayout xmlns:android="http://schemas.android.com/apk/res/android"
    android:layout_width="match_parent"
    android:layout_height="match_parent">

    <ImageView
        android:id="@+id/post_image_profileFragment"
        android:layout_width="100dp"
        android:layout_height="100dp"/>

</LinearLayout>
일단 나는 이미지 하나씩만 출력 할 것이기 때문에 이미지뷰 하나만 넣어 주었다.
그 다음은 이미지를 넣을 recyclerview를 xml에 넣어 준다
fragment_profile.xml
<?xml version="1.0" encoding="utf-8"?>
<LinearLayout
    xmlns:app="http://schemas.android.com/apk/res-auto"
    android:id="@+id/frame_lay"
    xmlns:android="http://schemas.android.com/apk/res/android"
    xmlns:tools="http://schemas.android.com/tools"
    android:layout_width="match_parent"
    android:layout_height="match_parent"
    android:orientation="vertical"
    tools:context=".bottomNavigation.ProfileFragment">

    <androidx.constraintlayout.widget.ConstraintLayout
        android:layout_width="match_parent"
        android:layout_height="match_parent">

        <.../>

        <androidx.recyclerview.widget.RecyclerView
            android:id="@+id/posting_recyclerview"
            android:layout_width="match_parent"
            android:layout_height="0dp"
            android:layout_marginTop="20dp"
            app:layout_constraintBottom_toBottomOf="parent"
            app:layout_constraintTop_toBottomOf="@+id/line" />

    </androidx.constraintlayout.widget.ConstraintLayout>
</LinearLayout>
이제는 recyclerview에 데이터를 담아야 한다.
recyclerview adapter를 만들자.
이 adapter는 profileFragment안에 만든 adapter이다.
class ProfileFragment : Fragment() {

	...

    override fun onCreateView(
        inflater: LayoutInflater, container: ViewGroup?,
        savedInstanceState: Bundle?,
    ): View {
        ...
    }

    inner class ProfileFragmentRecyclerAdapter: RecyclerView.Adapter<ProfileFragmentRecyclerAdapter.ViewHolder>() { ... }
}
profileFragmentRecyclerAdapter.kt
inner class ProfileFragmentRecyclerAdapter: RecyclerView.Adapter<ProfileFragmentRecyclerAdapter.ViewHolder>() {

        private var postDto = arrayListOf<PostDto>()
        init {
            val fireStore = FirebaseFirestore.getInstance()
            fireStore.collection("posts").get().addOnSuccessListener { result ->
                for (snapshot in result) {
                    if (snapshot["uid"].toString() == auth.uid) {
                        postDto.add(snapshot.toObject(PostDto::class.java))
                    }
                }

                binding.postCount.text = postDto.size.toString() + "개"
                notifyDataSetChanged()
            }
        }

        override fun onCreateViewHolder(parent: ViewGroup, viewType: Int): ViewHolder {
            val view = LayoutInflater.from(parent.context).inflate(R.layout.profile_fragment_recycler_item, parent, false)
            return ViewHolder(view)
        }

        override fun onBindViewHolder(holder: ViewHolder, position: Int) {
            val width = resources.displayMetrics.widthPixels / 3
            holder.profileImage.layoutParams = LinearLayoutCompat.LayoutParams(width, width)
            Glide.with(holder.itemView.context).load(postDto[position].imageUrl).into(holder.profileImage)
            binding.postCount.text = postDto.size.toString() + "개"
        }

        inner class ViewHolder(itemView: View): RecyclerView.ViewHolder(itemView) {
            val profileImage = itemView.findViewById<ImageView>(R.id.post_image_profileFragment)
        }

        override fun getItemCount(): Int {
            return postDto.size
        }
    }
- 이미지, 사용자uid를 담을 postDto 변수(배열)를 만든다.
private var postDto = arrayListOf<PostDto>()
- init안에 firestore 초기화, 자신의 데이터 위치에 따라 지정해준 다음 addOnSuccessListener
- for문을 이용해 로그인한 유저의 uid가 db의 데이터의 uid가 같으면 postDto에 값 추가
init {
        val fireStore = FirebaseFirestore.getInstance()
        fireStore.collection("posts").get().addOnSuccessListener { result ->
            for (snapshot in result) {
                if (snapshot["uid"].toString() == auth.uid) {
                    postDto.add(snapshot.toObject(PostDto::class.java))
                }
            }

            binding.postCount.text = postDto.size.toString() + "개"
            notifyDataSetChanged()
        }
}
이러면 postDto에 db의 데이터가 들어간다.
recyclerview 사용하기
1. onCreateViewHolder
override fun onCreateViewHolder(parent: ViewGroup, viewType: Int): ViewHolder {
    val view = LayoutInflater.from(parent.context).inflate(R.layout.profile_fragment_recycler_item, parent, false)
    return ViewHolder(view)
}
아까 만들었던 profile_fragment_recycler_item을 넣고 viewHolder로 return 해준다.
2. onBindViewHolder
override fun onBindViewHolder(holder: ViewHolder, position: Int) {
    val width = resources.displayMetrics.widthPixels / 3
    holder.profileImage.layoutParams = LinearLayoutCompat.LayoutParams(width, width)
    Glide.with(holder.itemView.context).load(postDto[position].imageUrl).into(holder.profileImage)
    binding.postCount.text = postDto.size.toString() + "개"
}
- 리사이클러뷰로 불러올 아이템들이 한줄에 3개씩 정렬되게 하도록 width 변수를 선언한다.
- LinearLayoutCompat.LayoutParams로 너비와 높이를 지정해준다.
나의 경우는 둘다 같게 하기 위해 width을 2번 사용했다.
- Glide를 사용해 image를 넣어준다
3. ViewHolder, getItemCount
inner class ViewHolder(itemView: View): RecyclerView.ViewHolder(itemView) {
    val profileImage = itemView.findViewById<ImageView>(R.id.post_image_profileFragment)
}

override fun getItemCount(): Int {
    return postDto.size
}
viewholder에 아이템의 id값을 넣고, getItemCount에는 배열(postDto)의 크기를 리턴한다.
실행 결과
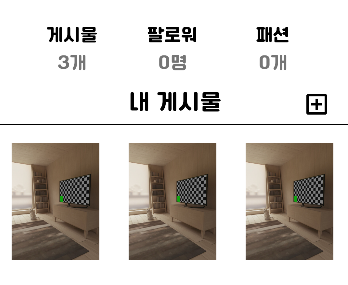
게시물의 개수와 게시물들의 사진이 보여지는 것을 볼 수 있다.
'📱| Android > 🔥 | Firebase' 카테고리의 다른 글
| [Android, Kotlin] firebase sns 앱 만들기 5(게시글 세부 기능) (0) | 2022.10.28 |
|---|---|
| [Andoird, Kotlin] firebase sns 앱 만들기 4(게시물 불러오기) (3) | 2022.07.19 |
| [Android, Kotlin] firebase sns 앱 만들기 3(게시물 생성) (2) | 2022.07.04 |
| [Android, Kotlin] firebase sns앱 만들기 2(로그인) (0) | 2022.06.23 |
| [Andorid, Kotlin] firebase sns 앱 만들기 1(회원 가입) (0) | 2022.06.19 |


